
You found a dark patch on a bathroom ceiling, a musty smell in a closet, or drywall that feels soft behind the sofa. Maybe an air conditioner drain backed up in August, or a storm pushed rain under a window. Whatever started it, the next few decisions matter more than most people expect, and the first one is whether you need a company at all.
This page walks through that decision honestly, then explains what a proper mold removal job involves from start to finish, what is different about Florida houses, and what to ask anyone you are thinking of hiring. If you only read one idea, make it this one: mold is a symptom. The water is the problem. A job that removes mold and leaves the moisture behind is a job that will be repeated.
When you do not need a company
Not every mold patch calls for a crew. The EPA's guidance on mold in homes says that a small area, roughly 10 square feet or less (a patch about 3 feet by 3 feet), can often be handled by the people who live there. That is the same general line Florida's rules draw between small and larger jobs. If what you have is a small, hard-surface problem and you know exactly where the water came from, you may be able to do this yourself.
Good candidates for a do-it-yourself job:
- Mold on tile, glass, sealed countertops, painted metal or other hard, non-porous surfaces
- A small spot on a bathroom ceiling or wall where the cause was obvious, such as a shower with no working fan, and the drywall is still firm
- A patch on a window frame or sill from condensation
- Mold on a hard item you can carry outside
For a job like that, protect yourself first. Wear an N95 respirator (a paper dust mask is not enough), gloves and eye protection that seals around your eyes, and keep the area ventilated away from the rest of the house. Scrub the surface with detergent and water, wipe it down, and let it dry fully. Throw away the rags and sponge in a sealed bag. Then fix the cause, because wiping mold off a wall that is still getting wet is only a pause.
Walk away from the do-it-yourself plan when:
- The area is bigger than about 10 square feet, or there are several patches that add up to more
- The material is porous and soft: drywall that crumbles, ceiling tiles, insulation, carpet and padding, fabric-covered furniture
- You cannot find or fix the water source
- The mold came back after you removed it once already
- Anyone in the house has asthma, a weakened immune system, or breathing trouble that gets worse at home
- The problem is inside a wall, above a ceiling, under flooring or in the air handler, where you cannot see how far it goes
- Sewage or floodwater was involved
If you are somewhere in the middle and not sure, a mold inspection is a visual look with moisture readings that shows where the water went and how far the damage runs. It costs far less than guessing wrong in either direction.
The sequence of a proper job
The order of the steps is most of what separates a job that holds from one that fails. A proper mold remediation follows the same logic every time, and the industry standard for it is ANSI/IICRC S520. Here is the sequence, and why each step comes where it does.
1. Fix the water first
Nothing else matters until the moisture is stopped. That might mean repairing a leaking supply line, clearing a clogged AC condensate drain, resealing a window, patching a roof leak, correcting a downspout that dumps against the wall, or adding a bath fan that actually vents outdoors. If the water source is still active, you are paying to remove mold that will grow back.
Sometimes the water source is not obvious, which is exactly why an inspection with a moisture meter and thermal camera comes first on a hidden problem.
2. Set up containment and negative air
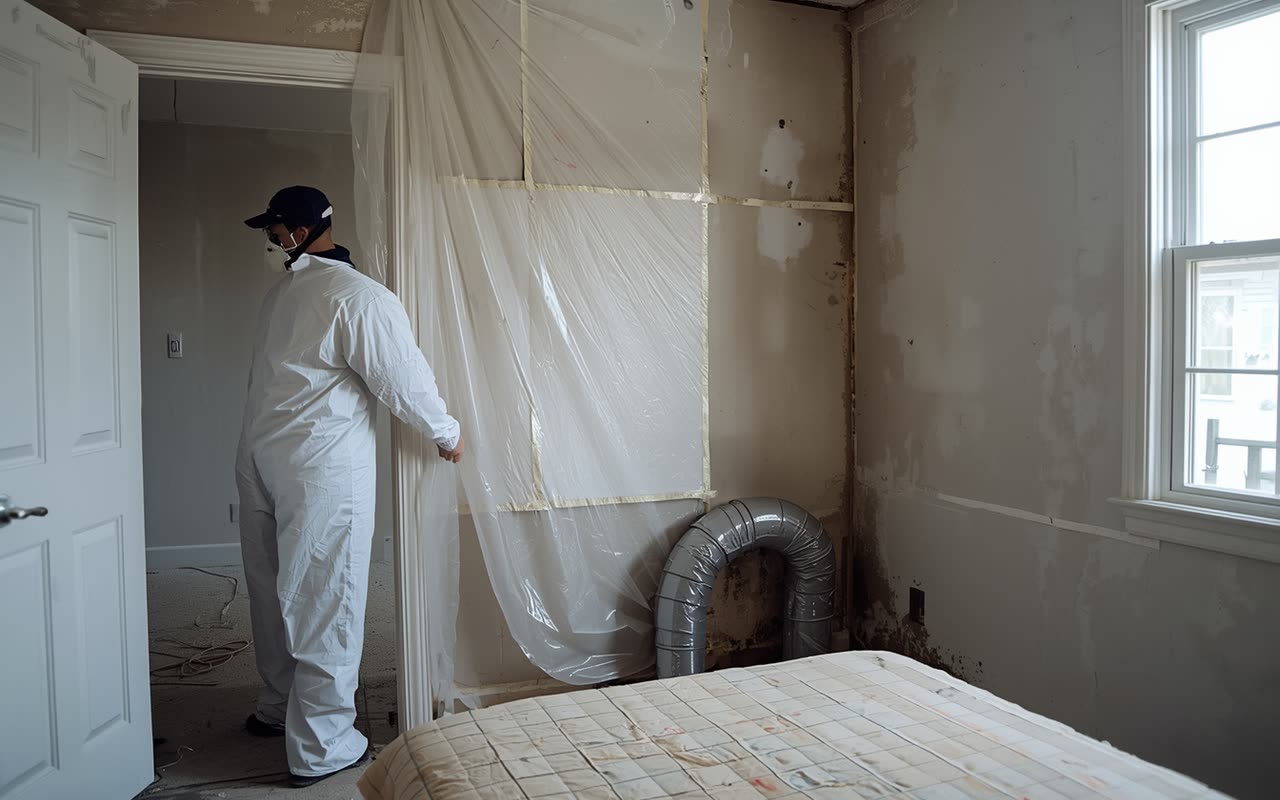
Disturbing mold throws spores into the air. If you tear out moldy drywall in one room with no controls, you spread the problem to every room the air reaches, including the AC return. Proper containment means sealing the work area with plastic sheeting, usually with a zippered entry, and running a HEPA air scrubber or negative air machine so that air flows into the work area rather than out of it. The exhaust is filtered and vented outside, and the air handler for the area is shut off or sealed so it does not pull the work area into the rest of the house.
Small, fully contained jobs may need less, and a closet is not the same as half a house. The point is that a plan for keeping spores where they are should exist before anything is torn out.
3. Remove porous material, treat what can be treated
This is where the real decisions are made. Mold on a non-porous surface can be physically removed. Mold that has grown into porous material (drywall, insulation, carpet, padding, ceiling tile, particleboard) generally cannot be removed from it, so the material comes out. The usual approach:
- Drywall and insulation that are wet or visibly moldy are cut out and bagged, typically cutting past the visible damage to reach solid, dry material. The bags go out sealed.
- Carpet padding and most carpet from a wet area are removed rather than saved.
- Wood framing is different. Studs, joists, plates and subfloor are structural and usually can be saved. The mold on them is removed by HEPA vacuuming and by mechanical methods such as wire brushing, sanding or other abrasion, then the wood is dried. Wood with real rot or structural damage gets replaced.
- Hard surfaces and contents that can be saved are HEPA vacuumed and wiped to remove residue.
You will notice what is missing: spraying and fogging as the main method. The goal is to physically take the mold out, not to make it invisible. Where a surface treatment is used at all, it follows removal rather than replacing it.
4. Dry the structure
After removal, what is left must dry. In Florida this step is bigger than it sounds, because the air outside is often as humid as the air inside. A fan and an open window can move wet air around for days. Real drying uses air movers and dehumidifiers matched to the space, set up so the dehumidifier is actually removing water from a closed or controlled area, and monitored with a moisture meter. The target is set against a dry reference reading taken from an unaffected part of the same house, not an arbitrary number.
5. Final moisture check
Before anything is rebuilt, the materials that remain should read dry, checked at the places where the water was worst, and the work area should look free of visible mold and debris. Only then is new drywall, insulation, paint or flooring installed. Covering damp framing with new drywall is how a house ends up with the same problem eight months later.
A written scope, a clear starting and finishing moisture reading, and photos of the work before it is closed back up are reasonable things to ask for. They are how you know what actually happened inside the wall.
What is different about mold in Florida homes
A house in Tampa, St. Petersburg or Brandon fights humidity most of the year. Outdoor air in summer is often so humid that wet materials can start growing mold in roughly 24 to 48 hours, and the usual advice to open windows and air things out frequently makes it worse. The problems we see over and over are specific enough to name.
Vinyl wallpaper and exterior walls. Vinyl wall coverings on the inside of exterior walls are a classic Florida problem. Warm, humid air moves through a block or stucco wall, meets a surface cooled by the air conditioning, and condenses behind the vinyl. The vinyl acts as a vapor barrier, so the moisture cannot escape and the paper side stays dry-looking. The first sign is often a musty smell, then dark spotting at seams or corners, then paper that peels. Taking the vinyl off and finding the back of it black is common.
AC condensation and drain lines. An air handler produces a surprising amount of water on a humid day, and it leaves the house through a condensate drain line. When that line clogs with algae and slime, the drain pan overflows. The water goes into the closet, the ceiling below an attic unit, or the wall around the air handler. Closet floors that smell damp, stained ceilings in a hallway, and rusty pans are all clues. Oversized units that cool the house quickly and shut off do not run long enough to dehumidify, which leaves the air damp even when it feels cold.
Closets, especially on exterior walls. Closets have little air movement, little cooling and often sit against exterior walls. Mold on the back wall of a closet, on shoes, leather goods or the bottom of a coat, usually points to a humid room or a wall that is wet from the outside. Moving things off the wall, adding space between the contents and the wall, and keeping the room's humidity down help, but a recurring closet problem points back to the wall or the AC.
Slab homes. Most Tampa Bay houses sit on concrete slabs with no crawl space beneath. When a pipe leaks in or under the slab, or water enters at the slab edge, it moves sideways into the bottom of walls and under flooring instead of draining away. Baseboards that swell, flooring that cups or lifts, a damp feeling in one spot, and a water bill that rises for no reason are all signs worth checking. Wicking up into the bottom of drywall is common, which is why drywall is often cut a foot or two above the floor.
Roof and stucco leaks. Heavy afternoon rain in rainy season finds weak spots: tile roof flashing, valleys, vent boots, cracked stucco, window and door seals, lanai edges. A slow roof leak can soak insulation and the top of a wall for months before a stain shows up on the ceiling. Stucco hides water behind it, and a stained or bubbling interior wall under a window is often a window or stucco leak rather than a plumbing one.
Seasonal and vacant houses. A house closed up for a summer with the AC off or set high is the perfect incubator. Mold on furniture, in closets and on walls when the owner returns is common. Keeping the air conditioner running and the humidity under about 60 percent is the cheapest protection a seasonal owner has. The humidity and mold guide covers the habits that make the biggest difference.
Black mold: what color does and does not tell you
People search for "black mold" because it sounds like the dangerous kind. Here is the honest version.
Color does not identify a mold. Molds come in black, green, white, gray, orange and many shades in between, and the same species can look different depending on what it is growing on and how old it is. You cannot tell what a mold is, or how harmful it is, by looking at it. A black patch is not automatically the species that makes the headlines, and a white or green one is not automatically harmless.
The health note. Mold can trigger symptoms in some people: stuffy nose, coughing, wheezing, itchy eyes, skin irritation. People with asthma, allergies, lung conditions or weakened immune systems can be affected more. The CDC's guidance is that there is no practical need to identify the mold to decide what to do: if you can see or smell it, it should be dealt with. If someone in your home is unwell and you suspect mold, talk to their doctor and tell them what you found.
Do not panic. Finding black growth on a wall is a reason to act, not a reason to leave the house in the night. Panic leads people to tear into the wall themselves with no protection, which throws more spores around than the mold was releasing sitting still. Stay calm, keep the area closed off, and keep the AC fan from drawing air across it if you can.
Same procedure. Whether the growth is black, green or white, the sequence above does not change: stop the water, contain, remove what cannot be saved, dry, confirm dry. A company that treats "black mold" as a special premium tier with a different price and a scare story is selling fear. A good one explains the same job in the same plain terms.
Attic mold
Florida attics are some of the hardest environments for a house to manage. In summer, attic air can get extremely hot and, because of the humidity, wet. That combination sets up several common problems.
Duct sweating. Air ducts and supply boots in the attic carry cold air. When warm, humid attic air touches a cold duct that is poorly insulated or has a failed seal, water condenses on the outside of it and drips onto insulation and ceiling drywall. The signs are brown rings on a ceiling directly below a supply register, damp insulation, and damp or rusty metal around the boot. It can look like a roof leak even though it is not.
Ventilation. Attics need airflow in through the soffits and out through ridge or roof vents. Blocked soffit vents (insulation pushed against them, or paint over them), too few vents, or vents that no longer work leave heat and moisture trapped. On the underside of the roof deck, dark staining and mold on the wood can be a ventilation problem rather than a leak.
Bath fans venting into the attic. One of the most common finds in a mold inspection: a bathroom exhaust fan whose duct was never connected to the roof or a wall, or whose duct came loose, so every shower pumps steam into the attic. The wood above the bathroom turns black, the insulation gets wet, and the ceiling below stains. The fix is a proper duct run to the outside, in addition to any mold removal.
Roof leaks. Slow leaks around penetrations (vent pipes, chimneys, skylights, tile flashing) wet the wood decking and insulation. In an attic, mold from a roof leak is usually concentrated in a trail below the leak point.
Attic remediation includes removing wet or contaminated insulation, treating or removing mold on the framing and roof deck, and fixing the source. It is rarely a job to do yourself. The heat, nails, limited space and ceilings that will not hold your weight make attics hazardous in more ways than just mold, and disturbed attic insulation is itself an irritant.
Crawl space and raised-floor mold
Older bungalows in Tampa, St. Petersburg and other long-established neighborhoods are often built with raised wood floors over a crawl space rather than a slab. They are charming, and they have their own moisture pattern.
Vapor from the ground. Soil in Florida stays damp, and moisture from it rises into the crawl space as vapor. Without a vapor barrier over the ground, that moisture condenses on cooler wood and ductwork and soaks into floor joists and subfloor.
Vents. Crawl space vents were designed on the idea that outside air would carry moisture away. In Florida, the outside air is often wetter than the crawl space, so open vents bring in humidity and the wood stays damp. The right answer varies from house to house, and some houses do better with the vents managed and the ground covered than with open, unmanaged vents.
Leaks and drainage. Plumbing leaks under a bathroom or kitchen, AC drain lines that empty under the house, and water collecting after storms all add to it.
Signs from inside. Floors that feel springy or cold, a musty smell near floor registers, baseboards that separate, and wood floors that cup are all common. Pests and rot can follow. If a crawl space looks wet, has standing water, or has mold on the underside of the floor, it is time for someone to look, with a flashlight and a moisture meter, before anyone pulls up the floors.
A crawl space is a tight, dark place that can hold animals, wiring and sharp debris, and it is not a good job for an amateur. Remediation usually involves removing damaged insulation, treating mold on the wood framing, correcting drainage and installing a ground vapor barrier so the cause is addressed.
Why bleach does not solve it
Bleach is the first thing most people reach for, and it is worth explaining why it is the wrong tool for most mold.
- It does not reach inside porous materials. Bleach is mostly water. On drywall, wood or grout, the chlorine stays at the surface while the water soaks in, which feeds the mold roots below. The stain disappears, the growth returns.
- It changes color, not the cause. Bleaching hides the dark pigment. It does not remove the dead and living mold material, which can still irritate people. The goal is removal, not a lighter stain.
- It is not a moisture fix. Mold is back as soon as the surface is damp again.
- It is a hazard. Bleach mixed with ammonia or other household chemicals produces toxic gas, and it can irritate eyes, skin and lungs, especially in a closed room.
The EPA's general guidance for homes does not recommend routine use of biocides or bleach to deal with mold. Physical removal and moisture control are what work. If you used bleach and the mold came back, that is typical, not a sign you did it wrong.
Florida's mold rules, in plain words
This is general information, not legal advice, and you should check current rules yourself.
Florida regulates mold work through the Department of Business and Professional Regulation (DBPR) under Chapter 468, Part XVI of the Florida Statutes. The state licenses two different roles:
- Mold assessors evaluate a property and write the plan, protocol or findings, including deciding whether sampling is needed.
- Mold remediators carry out the removal work.
The two are kept separate. As a rule, a person or company licensed to assess a property cannot also remediate it on the same job, and the reverse is also true. The idea is that the person who decides what needs to be removed should not be the person who is paid to remove it.
The rules also treat small jobs differently. Mold affecting roughly 10 contiguous square feet or less is handled differently from larger areas, which is the same general threshold the EPA uses when it says small jobs are often within a homeowner's reach. Larger jobs are where the state's licensing requirements apply to the people doing and assessing the work.
You can check a license on the DBPR website before you hire anyone, and you should. Ask for the license number, look it up, and confirm it is active and covers the kind of work being sold to you. Do the same for the assessor if you are hiring one.
What to ask any company before you hire
Whoever you talk to, these questions tell you quickly how a job will go.
- Can I see the license number, and is it active? For mold remediation over the small-job threshold, Florida expects a state license for the work. Look the number up on the DBPR site yourself.
- Where did the water come from, and how will it be stopped? If the answer is vague, the job will return.
- What is your containment plan? You want to hear plastic sheeting, negative air, HEPA filtration and the AC system dealt with, not just "we spray it."
- What comes out and what stays? Drywall, insulation, carpet and padding that are moldy should come out. Framing should be treated and dried. A company that proposes to spray over drywall and paint it is not removing anything.
- How will you dry it, and how will we know it is dry? Ask about dehumidifiers, moisture readings and a final reading against a dry reference.
- Will I get a written scope with photos? The scope should name rooms, materials and steps. Photos before the wall is closed back up are normal.
- Is the assessor separate from the remediator? If someone offers to assess and remove on the same job, ask how that fits Florida's rules.
- What does your plan cost, what is not included, and what could change it? A written price with clear assumptions beats a number on the phone. Costs vary widely with size, access, materials and how far the water went, so any number given before someone sees the job is a guess.
- Who handles rebuild? Some mold work stops at removal and leaves you to find a contractor for the drywall and paint. Ask who does what and in what order.
- How do you handle my insurance? Many homeowner policies cap or limit mold coverage, so read yours before you start, and ask the adjuster what they require.
Be careful of anyone who tells you the house is unlivable without looking, pushes you to sign before you have a written scope, or tries to sell you ongoing treatments or a long list of chemical products as the fix.
A short note on testing
You may have seen advertising for air quality tests or lab results and wondered whether you need one. This service is mold removal and a visual inspection with moisture readings. It does not include air sampling, surface sampling or a mold assessment, and neither does the work described on this page.
Florida licenses mold assessors separately from remediators, and the two cannot be the same business on one job. If you want sampling, a written assessment protocol, or a clearance report after remediation, hire a state-licensed mold assessor on your own, someone who has no financial interest in the removal work. For visible mold, though, a lab rarely changes what needs to happen: if you can see it or smell it and there is a water source behind it, the job is removal and drying either way.
Questions people ask
How much does mold removal cost in Tampa?
It depends on how far the damage runs, which is why anyone who quotes a firm price over the phone is guessing. A small area on an accessible wall costs far less than mold that has spread through insulation in an attic or through the lower walls of a slab house. Three things move the number most: the size of the affected area, whether drywall and insulation have to come out, and whether the rebuild is included. As a general idea, a small contained job can cost hundreds of dollars and a large one can reach into thousands, but a specialist quotes after seeing it.
Do I have to move out while mold is being removed?
Often not, if the work area is contained and the air system is sealed off. Larger jobs, or ones in the main living area, may be easier to live through if you stay elsewhere for a few days. Children, people with asthma and anyone with a compromised immune system are the group to think about first. Ask the company how they will keep the work area separate from the rest of the home.
Will the mold come back?
It will if the moisture does. Removal takes out what is there, but the house still has to stay dry. That means the source repaired, the air conditioner doing its job, indoor humidity kept under about 60 percent, bath fans venting outside, and gutters and grading sending water away from the house. If it returns in the same spot, the cause was not fully found.
Does homeowners insurance cover mold?
It varies. Many homeowner policies cap or limit mold coverage, and coverage often depends on what caused the water. A burst pipe may be treated differently from a long-term leak or from flooding, and standard policies generally do not cover flood at all. Read your policy, ask your agent or adjuster, and take photos before anything is removed.
Can I just paint over it or use a mold-blocking paint?
No. Paint over active mold hides it for a while and does not stop it, and the growth continues behind the paint. A special primer has a place after the material has been dried and the mold removed, not instead of removal. Painting over a wet wall also traps moisture in it.
How long does mold removal take?
A small, contained job can be done in a day or two, with drying afterward. Larger jobs take longer, and the drying phase depends on how wet the structure is and how humid the air is. The rebuild comes after the final moisture check, so it adds time. Ask for a schedule that separates removal, drying, the moisture check and rebuild.
Is it safe to stay in a house with mold?
For many people, small amounts of mold are an irritation rather than an emergency, but it should not be ignored, and some people react more strongly than others. If you have a breathing condition or a weakened immune system, take it seriously and talk to your doctor. Keep the affected area closed off, stop the water, and arrange the work soon rather than waiting.